Losing opportunities is very common for a business. Keeping track of the win/lost ratio is a good start if you want to track how you're doing, but making sure you keep a close look on what you've lost more important why, is critical.
The basics
There are a number of reasons you may lose an opportunity: The project may be cancelled, you may be too expensive or out-sold, or maybe you simply don't have the capacity to cater for bookings.
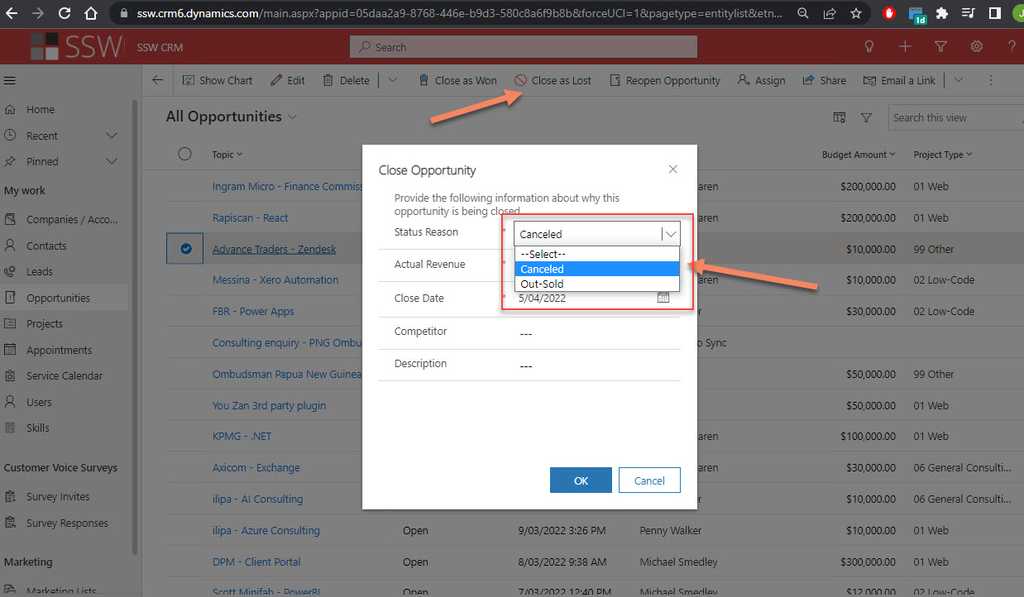
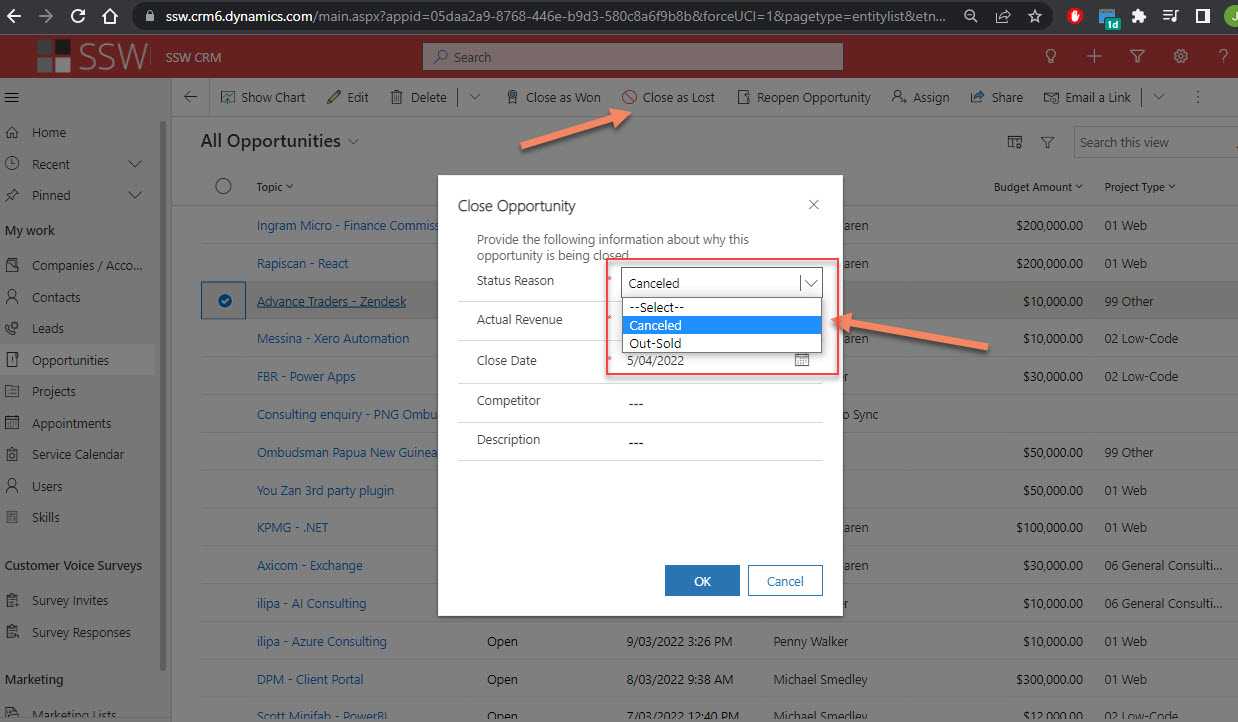
If you want to report on lost opportunities, the first step is to make sure Sales have the opportunity to do so. Make sure you provide a field with enough options when closing an opportunity:
Figure: Only giving a couple options is not enough
Figure: Give at least 4 options
Once the information is stored in CRM, you can then easily report on it, e.g. using PowerBI or any other reporting tool. This provides great insights to make educated business decisions (i.e. "should we hire more?")
Going the extra mile
Reporting is great, but this may come back through your feedback loop a bit too late. If you want to be alerted when you just lost a big opportunity because you don't have enough staff, you can go the extra mile and setup alerting based on conditions.
The best way to do so is to setup a LogicApp to trigger when an opportunity has been lost, setup your filters (e.g. Budget Amount >= $100,000 and Reason = "Not enough staff") and you're done!
Losing opportunities is very common for a business. Keeping track of the win/lost ratio is a good start if you want to track how you're doing, but making sure you keep a close look on what you've lost more important why, is critical.
Most people have now moved to SharePoint Online, either from scratch or by migrating content from previous versions of SharePoint. In SharePoint Online, a lot of legacy features have been deprecated and replaced by more modern counterparts. Unfortunately, chances are you have ported a whole lot of useless things as part of your migration.
[TODO: Screenshot of Useless stuff]
Before removing seemingly useless or old stuff, you should always make sure that site owners are OK with the deletion and that the data is actually not useful. In most cases however, the libraries detailed below have been added to your site by default and contain only demo and/or defautl data.
Process
The process to remove legacy items is always the same regardless of the library/list you're trying to remove:
Find the product or feature that replaces it in SharePoint Online
Deactivate the site feature associated with the list or library:
Either manually via:
Site Settings | Site Features | Feature XYZ | Deactivate
Or programmatically using:
# Connect and get contextConnect-PnPOnline -Url https://contoso.sharepoint.com# Get Feature Object$Feature = Get-PnPFeature -Scope Web -Identity $FeatureId#Feature IDs below# Get the Feature statusIf($Feature.DefinitionId -ne $null){ # De-activate the FeatureDisable-PnPFeature -Scope Web -Identity $FeatureId -Force}Else{Write-host -f Yellow "Feature is not active!"}
If feature is already disabled or if SharePoint throws an error on deactivation (can happen for very old features), perform a forced delete of the library using powershell.
# Connect and get contextConnect-PnPOnline -Url https://contoso.sharepoint.com$ctx = Get-PnPContext# Get list object$list = $ctx.Web.Lists.GetByTitle("Library_To_delete")# Force delete (send to recycle bin)$list.AllowDeletion = $True$list.Update()$ctx.ExecuteQuery()$list.Recycle() | Out-Null$ctx.ExecuteQuery()
MicroFeed
Microfeed has been replaced in SharePoint by Yammer webparts and is no longer supported.
Associated Site feature to disable: "Site Feed"
GUID: 15a572c6-e545-4d32-897a-bab6f5846e18
Announcements
Annoucements are now replaced by the news webparts [TODO: Link to news webpart doc]
Associated Site feature to disable: "Announcement Tiles"
GUID: 00bfea71-d1ce-42de-9c63-a44004ce0104
Workflow Tasks
SharePoint Worklow are deprecated and replaced by Power Automate [TODO:link to rule to PowerAutomate]
Associated Site feature to disable: "Workflow Task"
GUID: 57311b7a-9afd-4ff0-866e-9393ad6647b1
Drop-Off Library
Drop-Off Library is not deprecated in SharePoint Online explicitely, however it is considered best practice to user Power Automate to achieve the same results with much greater flexibility and maintainability.
Associated Site feature to disable: "Content Organizer"
GUID: 7ad5272a-2694-4349-953e-ea5ef290e97c
Most people have now moved to SharePoint Online, either from scratch or by migrating content from previous versions of SharePoint. In SharePoint Online, a lot of legacy features have been deprecated and replaced by more modern counterparts. Unfortunately, chances are you have ported a whole lot of useless things as part of your migration.
[TODO: Screenshot of Useless stuff]
Before removing seemingly useless or old stuff, you should always make sure that site owners are OK with the deletion and that the data is actually not useful. In most cases however, the libraries detailed below have been added to your site by default and contain only demo and/or defautl data.
When we first start out as a developer, we want to show the world what we can do by creating complex solutions. As we gain experience, we learn to show our worth by creating simple solutions.
Developers are like a fine wine, they get better with age.
One liner! Nailed it 🥳 Pity the next developer who has to decipher what is going on! The cognitive load here is really high! and the the maintainability, is really low. What is the first thing you are going to need to do if this piece of code start behaving poorly?
Now lets take the following reformatted code example:
Now this is nowhere near as terse, but anyone looking at it is able to quickly determine what is going on. And anyone who has to investigate any issue with the code is going to be able to step through and debug this without any issues.
This above is not an overly complicated example but now imagine something like this example
This was fortunately just someone's exercise in proving that they could and happily states
Just because you can, doesn't mean you should!
So what are some of the things that developers learn over time that takes them from being a Clever developer to being a Smart developer?
Avoiding problems
Clever developers fix a problem where Smart Developers stop a problem from happening.
Lets say you receive a PBI saying that XYZ method is always returning a value 0.001 more than it should.
Smart Developer
Identifies that some incoming data is always out and results in the small rounding issue.
return (value-0.001)
Clever Developer
Identifies that a method downstream is rounding to 2 decimal places and removes this.
Understanding the whole before they start
Code costs money, not just to create but also to maintain.
Figure: Clever developer coding away and resolving PBI's
When we first start out as a developer, we want to show the world what we can do by creating complex solutions. As we gain experience, we learn to show our worth by creating simple solutions.
Developers are like a fine wine, they get better with age.
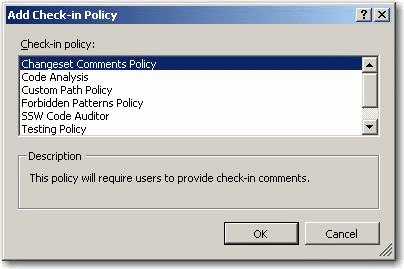
Check-in policies are a great tool to enforce quality code before it hits your source control repository. SSW recommends that the following check-in policies be enabled by default on your project:
Changeset Comments Policy - To enforce that all check-in contain comments
SSW Code Auditor - To enforce coding standards and best practices before check-in
Testing Policy - To enforce that unit tests should all pass before code can be checked-in
Code Analysis Policy – To enforce that code analysis rules are not broken
Builds Policy – To enforce that the developer has built the project end to end before they check-in
More Information
To enable these policies:
Right click the Team Project in Team Explorer > Team Project Settings > Source Control
Select the check-in policies above
Click OK
Chose check in policy Figure: Chose check-in policies in TFS
Check-in policies are a great tool to enforce quality code before it hits your source control repository. SSW recommends that the following check-in policies be enabled by default on your project:
Ensuring seamless connectivity during international travel is a crucial consideration, especially on business trips.
While obtaining a roaming package from your service provider is a common solution, you might face exorbitant bills upon returning home.
The question arises: How can one stay connected without the risk of huge bills?
There are few options:
1. Dual-SIM Phone (recommended):
If you travel overseas a lot, it may be worth considering owning a dual-SIM phone. This is highly recommended due to its cost-effectiveness, easy management, and enhanced security.
Take the popular iPhone as an example, which offers an eSIM and a physical SIM slot. You can convert your primary mobile number to an eSIM and keep the physical SIM slot for your travel SIMs.
✅Travel SIMs are usually data-only, cheap, and easy to acquire.
✅Travel SIMs can be pre-purchased weeks before you go – it is only activated once you connect it to the network.
✅Your mobile number is still active when overseas (with your eSIM) and the data usage stays with the travel SIMs.
2. Portable 4G Router:
Invest in a device, insert the local travel SIM, and share the Wi-Fi with multiple users and devices.
✅This option proves cost-effective, preserves your phone's battery life and is perfect for single-SIM phones.
❌You will need to carry an extra device.
❌You may miss out on free Wi-Fi – the router is connected by Wi-Fi so you cannot connect to others, for example, hotels.
3. Roaming package:
Rely on your current roaming service, for example, Telstra charges $10 per day for 1 GB of data and $10 per extra GB. Some other carriers may offer more competitive packages.
✅This method is straightforward, with no additional purchases, and a pay-as-you-go structure.
❌This can be expensive and occasionally poor internet connectivity.
Summary
Each option has its pros and cons, allowing you to tailor your connectivity strategy based on your preferences and specific travel needs.
Travel SIMs usually offers better user experience if you spend more data.
✅Travel SIMs are usually much cheaper than roaming packages.
✅They are prepaid and disposable.
✅ It can be a perfect combination with your roaming service to have enough cheap data to use and make calls from your roaming service. Of course, you will have your regular mobile connected as well, so you won’t miss the important calls and text messages.
❌Often limited to data only and will expire after a certain period.
❌ Bad Example - Exorbitant Telstra bills upon returning home due to roaming data usage of 120 GB.
✅ Good Example - Paying $129 AUD for 200 GB of data on a travel SIM to Europe.
Tip: travelling to China can be different due to the Great Firewall, which prevents you from accessing Google, Facebook, Teams etc.
It may require a VPN to access these services from a local network. But the travel SIMs purchased outside of China or roaming mobile data packages have no restrictions because your IP is where the SIMs are registered.
Ensuring seamless connectivity during international travel is a crucial consideration, especially on business trips.
While obtaining a roaming package from your service provider is a common solution, you might face exorbitant bills upon returning home.
The question arises: How can one stay connected without the risk of huge bills?
There are few options:
1. Dual-SIM Phone (recommended):
If you travel overseas a lot, it may be worth considering owning a dual-SIM phone. This is highly recommended…
If you are using Azure DevOps, there's an awesome Hosted Build Server option you can use to perform your builds with little to no setup. But if you're working on a project that has continuous integration and a long build time, it's not long before those build minutes start to add up.
To reduce your build costs, you could reduce the number of builds or try to reduce the build time. Continuous integration is very important so you don't want to turn that off, and we encourage checking in early and often. Reducing the build time is a nice idea, but you can't always reduce it enough to make a difference.
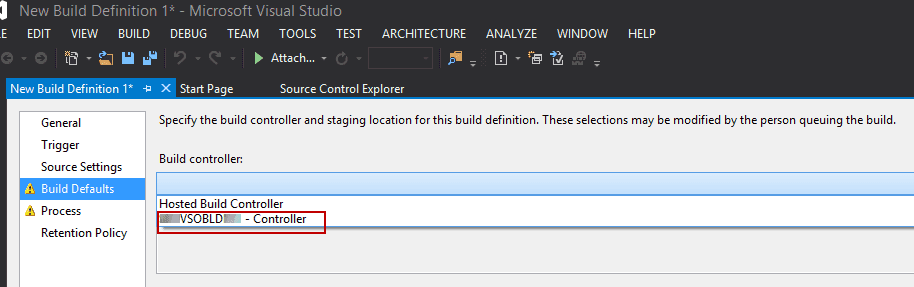
For large, expensive projects, the best option is to configure an on-premises build server rather than using hosted builds.
Once you have a build server configured, you'll be able to see the build controller as an option when you configure a new build definition.
Figure: Good Example - We have the option of an on-premises build controller as well as the Hosted Build controller
If you are using Azure DevOps, there's an awesome Hosted Build Server option you can use to perform your builds with little to no setup. But if you're working on a project that has continuous integration and a long build time, it's not long before those build minutes start to add up.
Earn this certification to prove that as a business stakeholder you can engage well with Power Platform developers to design and specify business automations.
Preparing for exams can involve a lot of work, and in some cases stress and anxiety. But remember, you're not in school anymore! You've chosen to take this exam, and no one is forcing you. So just sit back and enjoy the journey - you should feel excited by the new skills you will soon learn. If you want some great advice and tips, be sure to check out Successfully Passing Microsoft Exams by @JasonTaylorDev.
Good luck!
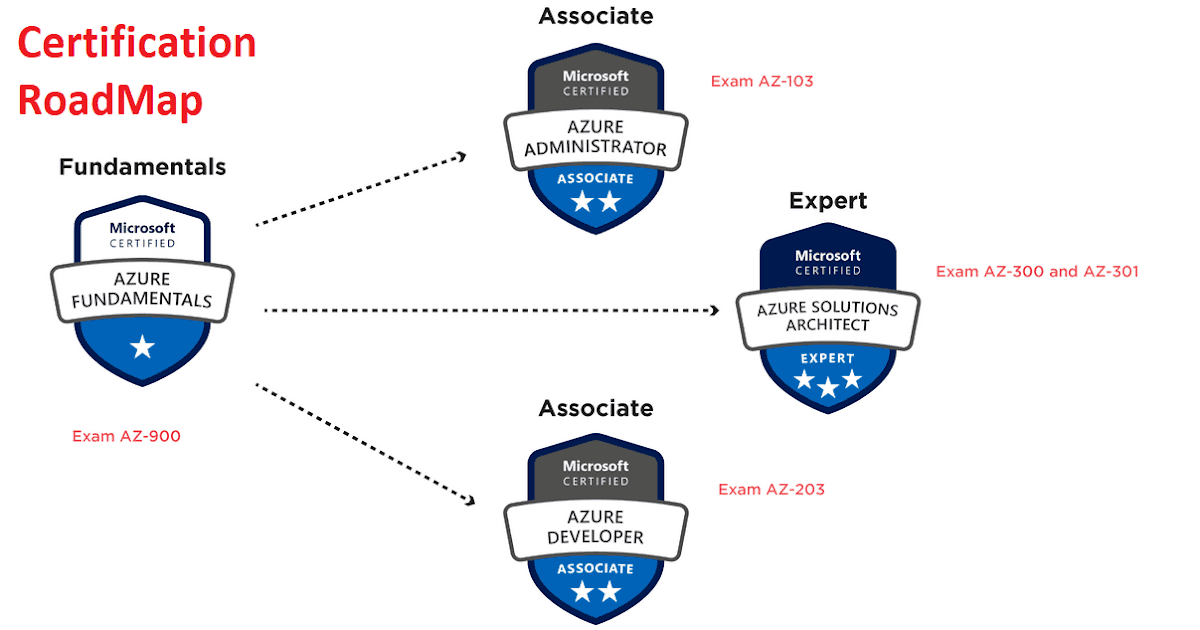
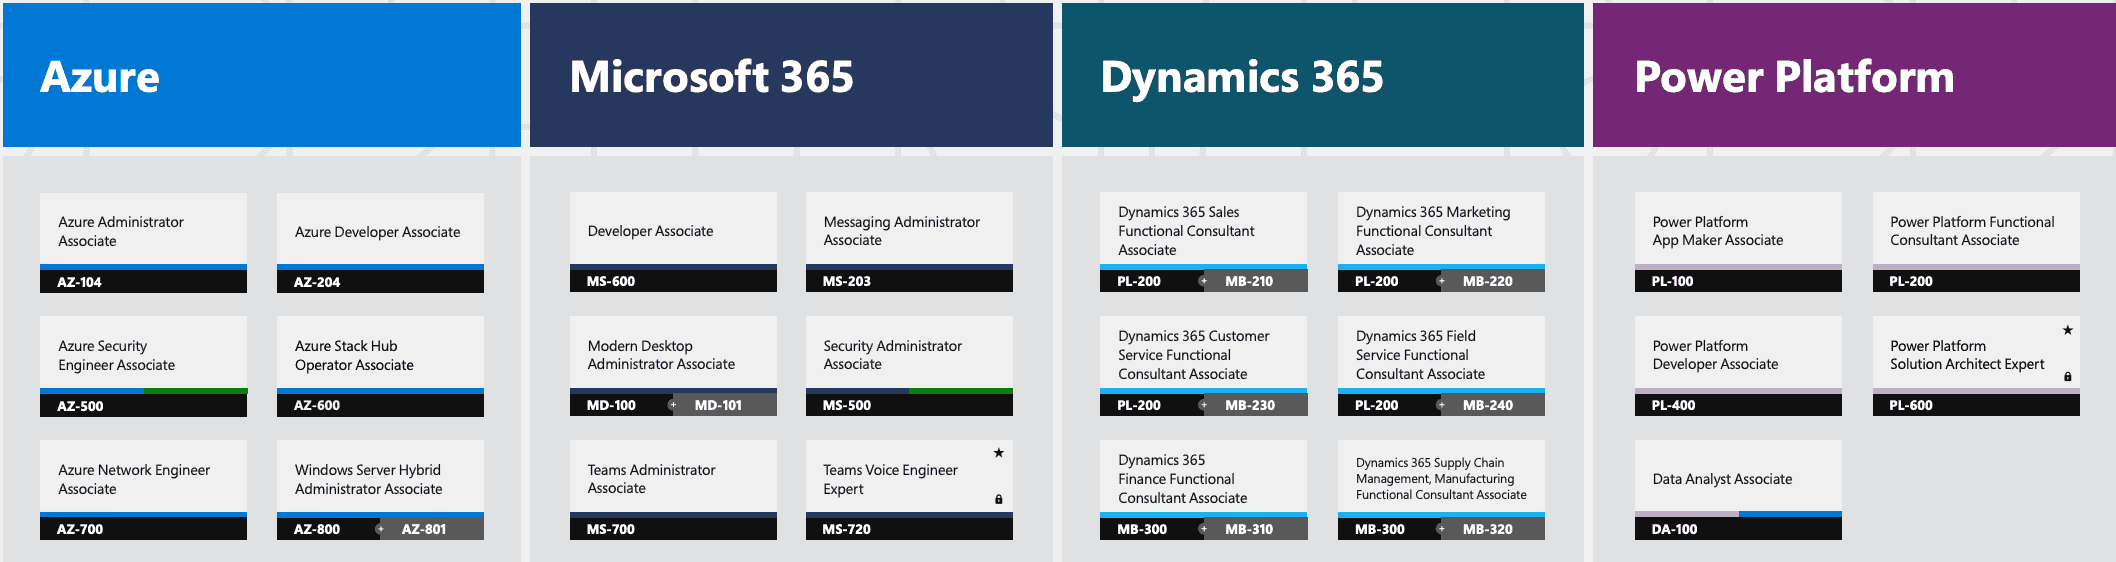
Whether you're an expert or just getting started, working towards gaining a new certification is a worthwhile investment.
Microsoft provides numerous certifications and training options to help you:
Responding to messages from the general public and clients on social media is an integral part of maintaining a company's online presence and reputation. Platforms like LinkedIn, Meta (Facebook, Instagram, WhatsApp), X (formely Twitter) and others provide different avenues for these interactions.
Focusing primarily on LinkedIn, this rule outlines how to effectively manage and respond to messages ensuring that the conversation aligns with the utility and purpose of the feature.
LinkedIn Company Pages
When messaging for your Page is enabled on LinkedIn, members can directly communicate with your company. This feature is a powerful tool for engaging with a professional audience, allowing for direct interaction and networking. And the best part? You can select conversation topics 😃
The reply feature plays a pivotal role in managing LinkedIn communication and interactions if your businesses frequently receive inquiries from clients, potential employees, and partners.
How to Enable Messages for LinkedIn
To enable messages for your Page:
Go to your Page super or content admin view.
Click Inbox in the left menu.
Click the three dots (more icon) to the right of Inbox.
Select Inbox settings from the dropdown menu.
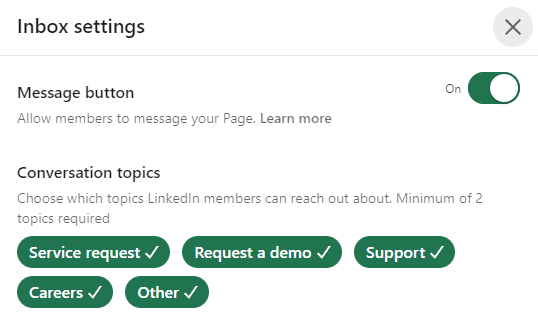
Turn on the Message button toggle on the right and select relevant conversation topics.
Figure: Inbox settings screen.
Click Save in the upper-right corner.
Key Aspects of the Reply Feature
Here are some keys reasons why you should consider implementing the LinkedIn reply feature.
Pre-set Responses: Setting up pre-written responses to common inquiries relating to conversation topics such as requesting a demo, careers, service request and gneralt support.
Common Questions: For frequently asked questions based on the above conversation topics, automated replies provide instant information, improving the user experience and reducing the inital workload on your team.
Conversation Topics: On platforms like LinkedIn, automated replies can be aligned with selected conversation topics, ensuring relevance in responses.
Time-Saving: It significantly reduces the time spent on repetitive queries, allowing your team to focus on more complex inquiries that require personalized attention.
Customer Experience: Immediate responses to inquiries, even if automated, enhance the customer experience, as users receive prompt acknowledgments and information.
Best Practices for LinkedIn Messaging
Assign the Right Admin Roles: Ensure that individuals with the 'super' or 'content admin' role are equipped to reply to messages. This is particularly important for specific conversation topics, like "Careers," where subject matter experts should manage interactions.
Prompt Responses: Aim to reply to messages as quickly as possible to maintain engagement and show that your company values the interaction.
Setting Up Conversation Topics: When enabling messaging, select conversation topics that reflect the subjects you want members to inquire about. This helps in guiding the conversation and ensuring relevance.
Edit Conversation Topics for Accuracy: Modify the topic of a message to accurately reflect its content. This aids in organizing and filtering conversations in your inbox.
Option to Disable Messaging: If necessary, you can disable the messaging feature from your inbox settings. This removes the "Message" button from your Page and stops new messages from members.
Ensure that your LinkedIn Page messaging reflects your company's voice and expertise, and that it's managed by knowledgeable team members.
Meta: Limited Engagement
Meta's tools are particularly effective for businesses targeting a demographic that is highly engaged on social media, especially for consumer-focused interactions.
However, for B2B communications or audiences less active on social platforms, the utility of Meta's messaging features is limited.
X: An Alternative Approach
X offers messaging features that might provide alternative advantages for certain business communications. It's crucial to evaluate how user demographics align with your company's goals and target audience.
If your business caters to a more professional or niche market, X is a great tool for targeted B2B communications or reaching specific customer segments.
Responding to messages from the general public and clients on social media is an integral part of maintaining a company's online presence and reputation. Platforms like LinkedIn, Meta (Facebook, Instagram, WhatsApp), X (formely Twitter) and others provide different avenues for these interactions.
Focusing primarily on LinkedIn, this rule outlines how to effectively manage and respond to messages ensuring that the conversation aligns with the utility and purpose of the feature.
On large frontend projects with lots of components it's common to have issues with your CSS classes overwriting each other or conflicting.
There are a few different ways to solve this.
It can be very frustrating when CSS classes overwrite and behave differently to how we want them to.
Figure: Overwritten CSS can make our site styles break
Debugging this can be a nightmare on larger projects with huge amounts of styling as you need to comb through the entire file to find what's overwriting the style.
h1 {color: red;}/* 3000 more lines of code... */
Utility Classes
One solution to this problem is using a CSS framework such as Tailwind.
Benefits
Faster setup
Simple to use
Faster development speed once devs are familiar with it
Disadvantages
Poor readability as you add more classes
Learning curve for class names
Scoped CSS
Most frontend frameworks such as Blazor, Angular and React support scoped CSS, allowing you set CSS classes on a component level.
When you create a scoped CSS file, those classes are only accessible to the component that the CSS file is associated with.
This is useful as you don't need to worry about class names or CSS values conflicting with eachother like you would if all the classes are set at the root level.
It also makes it much easier to change styling on individual components without breaking the styling on other classes.
Benefits
Can reuse class names in each component without conflicts
Disadvantages
Styles have to be manually written
Blazor
In Blazor scoped CSS files are associated with components with dot syntax.
For example, if we have a component called MyComponent.razor, we can create a file called MyComponent.razor.css and the classes set in that file will only apply to MyComponent.
Inheritance
Blazor supports having scoped CSS classes inherited by child components.
<MyComponent> <MyChildComponent /></MyComponent>
In MyComponent.razor.cs, if we use the ::deep psuedo selector on a class, it will be applied to MyChildComponent.
On large frontend projects with lots of components it's common to have issues with your CSS classes overwriting each other or conflicting.
There are a few different ways to solve this.
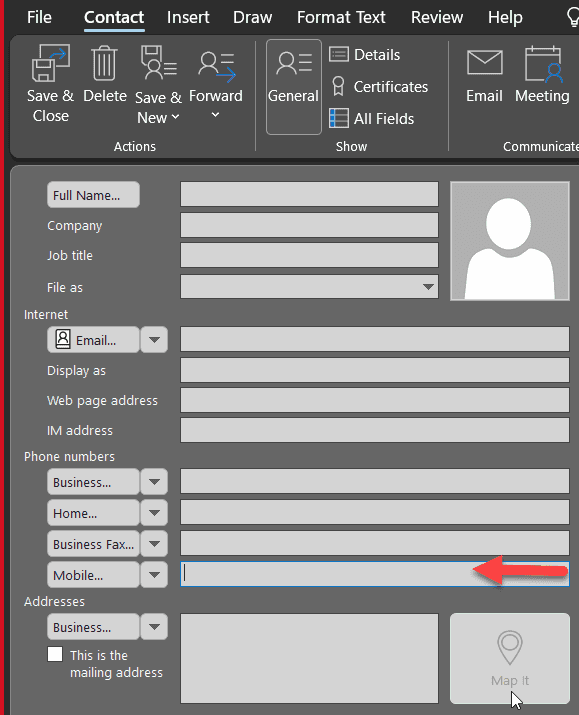
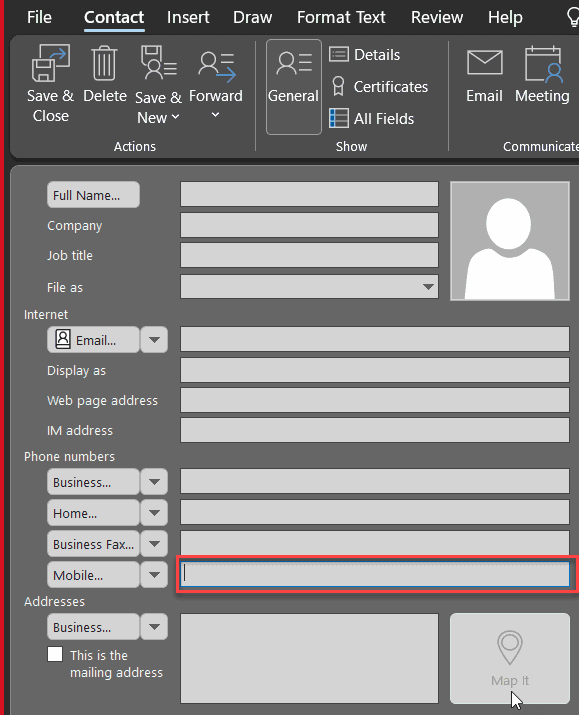
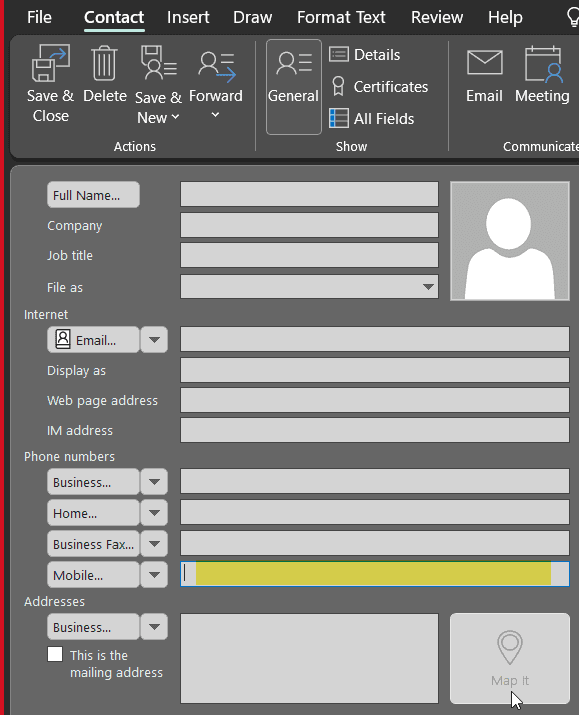
It is great when people use screenshots. You can communicate better by using screenshots with balloons and other visual elements (arrows, shapes, and highlights) instead of only text. Read the benefits of using screenshots.
We recommend you define a standard style for your visual elements by changing the default colors and shapes according to your branding.
See some examples of different visual elements under same branding:
Figure: Indicate someone to enter the mobile field. Do you use a red arrow?
It is great when people use screenshots. You can communicate better by using screenshots with balloons and other visual elements (arrows, shapes, and highlights) instead of only text. Read the benefits of using screenshots.
Encouraging professional development and recognizing achievements are crucial for fostering a positive workplace culture. SSW's Certification Reward system is a testament to this, offering additional leave to employees who complete Microsoft certifications. This initiative not only motivates employees to pursue further learning but also highlights the company's commitment to staying at the forefront of technology.
Understanding Certification Rewards
Certification Reward is a special category of leave granted to employees as a form of recognition for their effort and time invested in completing Microsoft certifications. Here's how it works:
Award Criteria: Employees become eligible for a Certification Reward upon successfully completing a Microsoft certification
Visibility and Tracking: A distinct leave category should be used within your accounting system specifically for Certification Reward
Not a Fairwork Mandate
It's important to note that the Certification Reward is not mandated by Fairwork. Instead, it's a proactive approach to incentivize its team members to engage in professional development, specifically around Microsoft technologies. This strategic focus not only enhances individual skill sets but also elevates the collective expertise within the company, ensuring you remain competitive and innovative in delivering solutions.
The Certification Reward system exemplifies how valuing and investing in employees' growth can create a dynamic and forward-thinking workplace culture. It's a clear win-win: employees expand their expertise, and strengthens your company's capability to deliver cutting-edge solutions.
Encouraging professional development and recognizing achievements are crucial for fostering a positive workplace culture. SSW's Certification Reward system is a testament to this, offering additional leave to employees who complete Microsoft certifications. This initiative not only motivates employees to pursue further learning but also highlights the company's commitment to staying at the forefront of technology.
Long Service Leave (LSL) is an essential benefit for employees, recognizing their dedication and long-term commitment to a company. Many accounting solutions do not automatically calculate LSL provisions. This lack of automation can lead to transparency issues, as employees may find it difficult to track their LSL balances. Furthermore, the legislation governing LSL varies significantly across regions, adding an extra layer of complexity. For instance, the provisions in Victoria differ from those in New South Wales, necessitating a tailored approach for businesses operating in multiple states.
Adhering to Varied Legislation
The Challenge: The rules surrounding LSL are not uniform across all states and territories in Australia, making compliance a tricky affair for businesses operating in multiple locations.
Solution: To navigate this complexity, businesses must:
Stay informed: Keep abreast of the LSL legislation in each state or territory where the company operates
Tailor payslip information: Customize the payslip information to reflect the specific LSL provisions applicable to each employee, based on their work location
Visibility of Long Service Leave
The Challenge: Employees deserve and need clear visibility of their LSL accruals to plan their future and feel secure in their employment benefits. The absence of this information can lead to confusion and dissatisfaction.
Solution: Even if your accounting solution doesn't automatically calculate LSL, businesses must find a workaround to ensure this information is transparent and accessible to all employees. This might involve:
Manual calculations: Regularly update LSL accruals and ensure they are clearly stated on employee payslips
Use of supplementary tools: Consider leveraging third-party solutions to manage LSL calculations and display them on payslips
Figure: Bad example - Employees have to ask HR for their LSL balance, leading to a backlog of inquiries
Figure: Good example - LSL balances are updated regularly and displayed on every payslip
Ensuring employees have visibility of their LSL balances is not just about compliance; it's about valuing your workforce and their contribution to your company. Despite the technical limitations of some accounting tools, with a proactive and informed approach, businesses can provide their employees with the transparency they deserve and ensure compliance across different legislative landscapes.
Long Service Leave (LSL) is an essential benefit for employees, recognizing their dedication and long-term commitment to a company. Many accounting solutions do not automatically calculate LSL provisions. This lack of automation can lead to transparency issues, as employees may find it difficult to track their LSL balances. Furthermore, the legislation governing LSL varies significantly across regions, adding an extra layer of complexity. For instance, the provisions in Victoria differ from those in New South Wales, necessitating a tailored approach for businesses operating in multiple states.
The current trend in web development is to use a large range of front-end libraries to give a great user experience.
However, .NET devs know it is no easy task to manage all of these on top of a large script folder. Previously we tried to improve and streamline the process by using NuGet, but found this package manager was ill-suited.
Another issue was that due to the requirement of checking the library’s files into source control, this has the potential to grind fellow devs to a halt while Visual Studio tries to make sense of the myriad of small JavaScript files. Furthermore, there were many smaller tasks that needed to be completed, such as minification and bundling. In the older versions of Visual Studio, a large portion of these tasks had be performed manually by the developer.
Needless to say, however a developer could try to tackle this task, it was always a challenging and time consuming endeavour.
Enter Visual Studio 2015 with NPM (Node Package Manager) in-built. This package manager has been built from the ground up to make downloading your JavaScript libraries simple. These tools existed outside of the .NET space, but in 2015 they’ve been brought into the fold and made easy to use in Visual Studio 2015.
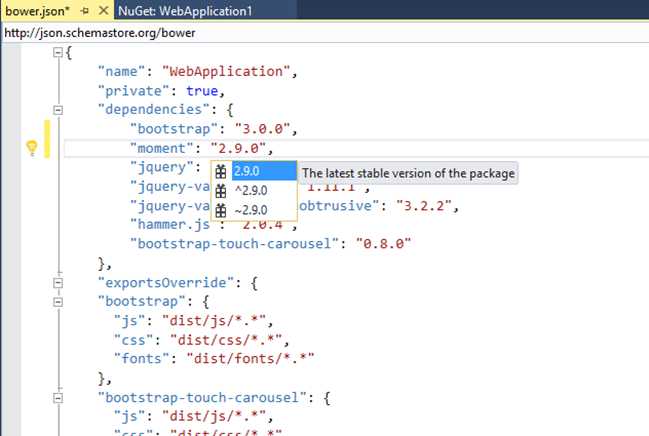
With NPM, we specify the name of the package and the version number we want to use, and the tool does all of the hard work finding and downloading the library. Because NPM is run on each developer’s machine, libraries are no longer added to source control. Rather, they are quickly downloaded from the trusted NPM CDN.
Figure: Example of NPM in action
Working in tandem with NPM are task runners, which are JavaScript tools that can be used to add automation to your project by having them perform simple yet tedious tasks that are required to get your libraries ready for use, such as compilation, linting, and minification. Just use NPM to install the task runner of your choice, and away you go.
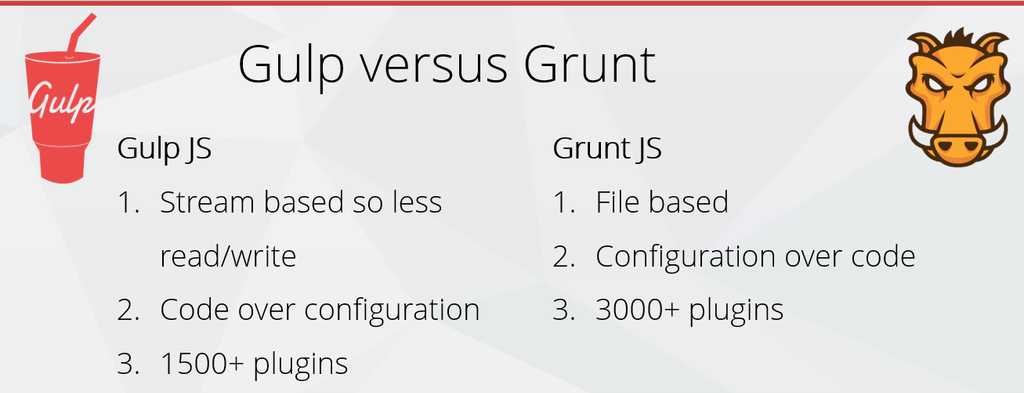
There are a heap of different task runners out there, the two best known are Gulp and Grunt.
Figure: In short they both perform the same job but Gulp is faster and requires less configuration
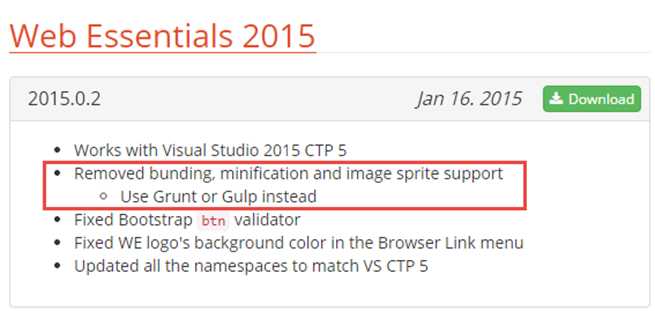
For example, we could previously use web essentials to do a lot of the necessary bundling and automation, but this was killed off at the start of 2015.
Figure: The updated feature list for Web Essentials 2015
This key feature was removed, but with the addition of tasks runners to Visual studio 2015 we can reimplement the functionality, by using ether Gulp or Grunt. For a number of reasons, Gulp is the better choice over Grunt: seen below is an example of a task for Gulp that will compile .less to .css.
The current trend in web development is to use a large range of front-end libraries to give a great user experience.
However, .NET devs know it is no easy task to manage all of these on top of a large script folder. Previously we tried to improve and streamline the process by using NuGet, but found this package manager was ill-suited.
Another issue was that due to the requirement of checking the library’s files into source control, this has the potential to grind fellow devs to a halt while Visual Studio tries to make sense of the myriad of small JavaScript files. Furthermore, there were many smaller tasks that needed to be completed, such as minification and bundling. In the older versions of Visual Studio, a large portion of these tasks had be performed manually by the developer.
When a designer (or a developer) adds style (CSS) files to SharePoint - care must be taken regarding where the files are placed:
Some places are are not suitable because they are not good for deployment
Other places may have permission issues - designers can't access them
Some files are part of the site definition and should not be customized
So the rules are:
Never modify out of the box SharePoint files in /Style Library/ - those files are part of the site definition, if you customize them they are hard to deploy
Start with a clean, minimal masterpage
Create and reference your own CSS files and put them under /Style Library/CSS/<client>/
You may want to further divide your CSS paths according to the areas of the site that your CSS is designed for:
E.g. /Style Library/CSS/SSW/Clients/layout.css
Designers can modify the XSL file as well!
put them under /Style Library/XSL Style Sheets/<client>/
When a designer (or a developer) adds style (CSS) files to SharePoint - care must be taken regarding where the files are placed:
Some places are are not suitable because they are not good for deployment
Other places may have permission issues - designers can't access them
Some files are part of the site definition and should not be customized
Creating a comprehensive summary and recording of Sprint Reviews is a great way to communicate changes in a Product to the community and stakeholders. Especially for people who are unable to attend these meetings.
Why Create a Summary and Recording?
Enhanced Clarity and Transparency: Provides a clear, accessible update for all stakeholders, including those not present.
Documentation for Future Reference: Serves as a historical record of decisions and discussions, valuable for future sprints and project continuity.
Inclusive Stakeholder Engagement: Ensures that all stakeholders, regardless of their availability to attend, have access to the same information, promoting inclusiveness and alignment.
Community Engagement: Allows the community at large to see what is happening on a product and provide feedback.
Best Practices for Effective Summaries and Recordings
Preparing the Summary
Highlight Key Points: Focus on decisions made, goals achieved, and major discussions.
Use Clear, Concise Language: Ensure that the summary is easily understandable, avoiding technical jargon where possible.
Include Actionable Items: Clearly note any action items or decisions that require follow-up.
Keep it Generic: Viewers might not have the same context of the Product, so try to present PBIs as though the viewers do not have prior knowledge.
Runsheet
Here's a suggested runsheet for what to cover in the video:
Show the Product website
Run through Sprint Review Email
Run through Sprint Planning Email
Finish on the Product YouTube Channel
Making the Recording
Ensure Good Audio Quality: Use a decent microphone and test audio levels before starting.
Capture Visuals: Record the screen or presentation to provide context to the discussions.
Keep it Engaging: Even though it’s a recording, try to keep the delivery lively and engaging to maintain viewer interest.
Utilizing Modern Tools for Recording and Editing
Using Microsoft Teams Record Feature
Start Recording: Utilize the built-in recording feature in Microsoft Teams to capture both audio and video of the Sprint Review.
Notify Participants: Always inform participants that the session is being recorded, ensuring compliance with privacy policies.
Editing with ClipChamp
Import the Recording: Once the meeting is over, download the recording and import it into ClipChamp.
Edit for Clarity: Trim unnecessary parts, highlight key moments, and add titles or transitions to enhance viewer understanding.
Use a consistent professional thumbnail: Get the design team to make you a nice thumbnail to use for your Sprint Reviews so that it looks professional.
Export and Share: Once edited, export the final video and consider uploading it to a platform like YouTube for easy access and sharing within your organization.
Examples of Good vs. Bad Practices
"Simply jotting down a few notes or making a low-quality audio recording on a phone."
Figure: Bad example - Inadequate details and poor audio quality can lead to misunderstandings and disengagement
"Preparing a structured document that highlights all key outcomes, decisions, and next steps, accompanied by a high-quality video recording of the session."
Figure: Good example - Provides a comprehensive and clear record that is useful for all stakeholders
By adopting these practices, teams can ensure that the outcomes of Sprint Reviews are effectively communicated and documented, supporting project success and stakeholder satisfaction.
Creating a comprehensive summary and recording of Sprint Reviews is a great way to communicate changes in a Product to the community and stakeholders. Especially for people who are unable to attend these meetings.
A standard menu item "Check for Updates" should be available in the Help menu. Its function is running SSW Diagnostics to check updates and keep the system up to date easily. More on Do you allow users to check for a new version easily?
A standard menu item "Check for Updates" should be available in the Help menu. Its function is running SSW Diagnostics to check updates and keep the system up to date easily. More on Do you allow users to check for a new version easily?
TODO: Byrden - needs a new home (category) and a complete rewrite
Old content from Better LINQ on .ASPX pasted below
Despite what it looks like, the var keyword is not a throwback to the dark ages where we did not have strongly typed variables. It is just a short hand to save developers from typing out the type of a variable.